thirty bees processes images before they are visible on your product page. A lot of images. For every type you can find on the back office page “Settings > Images” there’s a new image made. thirty bees does this to optimize image display on the page. This often means that you do no longer show original photos of your products on your pages, but photos that have been resized and processed by thirty bees. Since thirty bees is a PHP framework there are two engines that it could use to process images: GD and ImageMagick. The most used engine is GD. It is a very simple images processor and it suitable for most use cases. For e-commerce it is a different story. Merchants often complain about how colors look washed out or totally different after they have uploaded their photos via the back office. How is this possible?
Color profiles
If you’re lucky, the photos you upload via your back office have an embedded color profile. Basically, what this profile does is it tells your monitor or printer how to handle colors. If a photo comes embedded with a profile, the printer or monitor often knows how to handle the colors properly and can make sure that the colors are displayed in the best way possible.
For the internet this works a bit differently. Web browsers often limit the color profiles they can use to a single profile called sRGB. This is often not a problem if your source photos were taken with sRGB, but this is usually not the case. Especially after processing your photos with for example Adobe PhotoShop there is a big chance that your photos will get the Adobe RGB profile. Now, what happens when you upload your PhotoShop images directly via your back office, is that thirty bees will use the GD library to convert them for the web. Effectively, this means an Adobe RGB to sRGB conversion. Two different color profiles. Can GD bridge the differences? No, unfortunately it cannot and what’s worse, it just removes the Adobe RGB profile and presents it as a web safe version, which causes the colors to look “washed out”. Here’s an example:
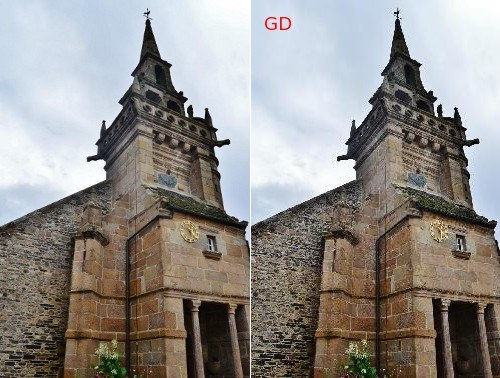
Original vs. GD
More differences
As you might have noticed in the example, colors are not the only differences. There is a lot more going on when processing images. Can you see just how pixelated the image looks? GD did a terrible job here. Here is the same image processed by ImageMagick:
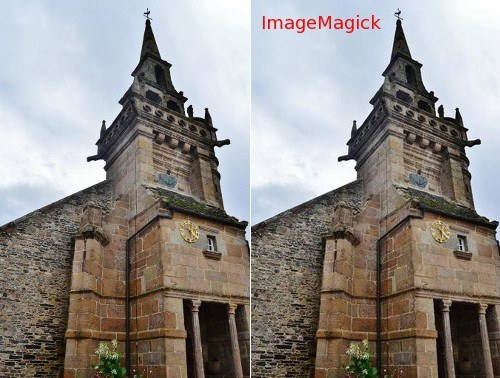
Original vs. ImageMagick
Do you see just how much better it looks? In fact, you can even apply some additional optimizations with ImageMagick if you like. There are many more options when using ImageMagick instead of GD. Let’s show the processed images side-by-side so you can see how important it is to use the right image processor:
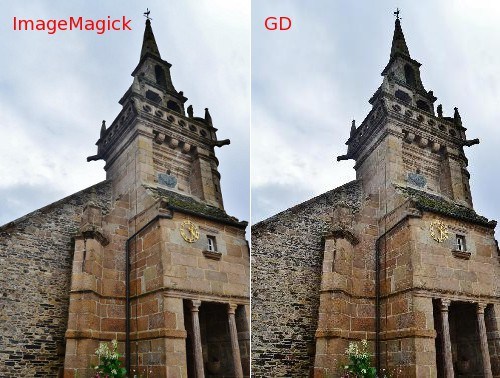
ImageMagick vs. GD
To make sure you get a result that is as nice as the photo on the left we have released an ImageMagick module. By default it converts the color profiles properly and applies a few optimizations. We expect that these settings are suitable for 90% of our users, but if you are feeling adventurous try to change a few of those settings and see if it improves the images. Be aware, though, that applying too many filters might slow down image processing tremendously so be careful when tweaking the settings.
Go ahead and improve your images! If you are using thirty bees 1.0.1 or higher you can find the module in your module list as a native module, or you can use the button below. The download button will take you to the page with the latest version of the module. You will want the file looking like mdimagemagick-vx.x.x.zip.
Credits go to Zeb on the Web Rank Info forum for the original post and research: http://forum.webrankinfo.com/miniature-cache-image-volee-t169855.html
Our thanks go out to Robert Andersson for helping with building the module.

Hi,
I have a question about this module. Can it resize the images to specific dimensions to be used for mobile or tablet? I am thinking to implement something like picture-fill.js
Does this solution exists for thirty bees or prestashop?
Thanks
No, it does not do that. Your best bet would be to write a src set in your theme and generate the images on the backend. You can see in the community theme an example on how to use src set in the product-list.tpl file.
Hi,
Great feature build in! I love TB! https://uploads.disquscdn.com/images/4aadd7718be02d8670214f5becf6680d909cd9d127f9093699c737c8601f00fb.png
What settings for the PNG data encoding filter would you recommend for a clothing shop? Reading the website of imagemagick it tells me landscape images would do nice with adaptive setting.
The settings are really subjective. You want the best compression without showing any visible artifacts. So it is likely something you are going to have to play around with. Different images and styles artifact differently.