As a merchant, it is important to have a streamlined process to handle order submissions, to facilitate the shipping process and deliver as quickly as possible. Let’s have an in depth look at thirty bees’ order statuses’ inner workings and see how they can help us organize and ship orders in the most efficient possible
manner.
What is an order status?
To understand what statuses are, let’s reach the Orders page in the back office to start with.

What reads under the Status heading represents the state the order is currently in, and it’s meant to inform both the merchant and customer about how the order process is continuing after it’s been placed. Is there any action needed on the customer’s end? Or should the merchant take action instead? Has there been an error with the payment method? These are all questions Order Statuses are meant to answer.
Some of them are automatically triggered by the system, while others must be set by the employee processing orders in the back office.
The order Status Panel
Let’s now have a look at what the default statuses are. Click on Orders, then Statuses.
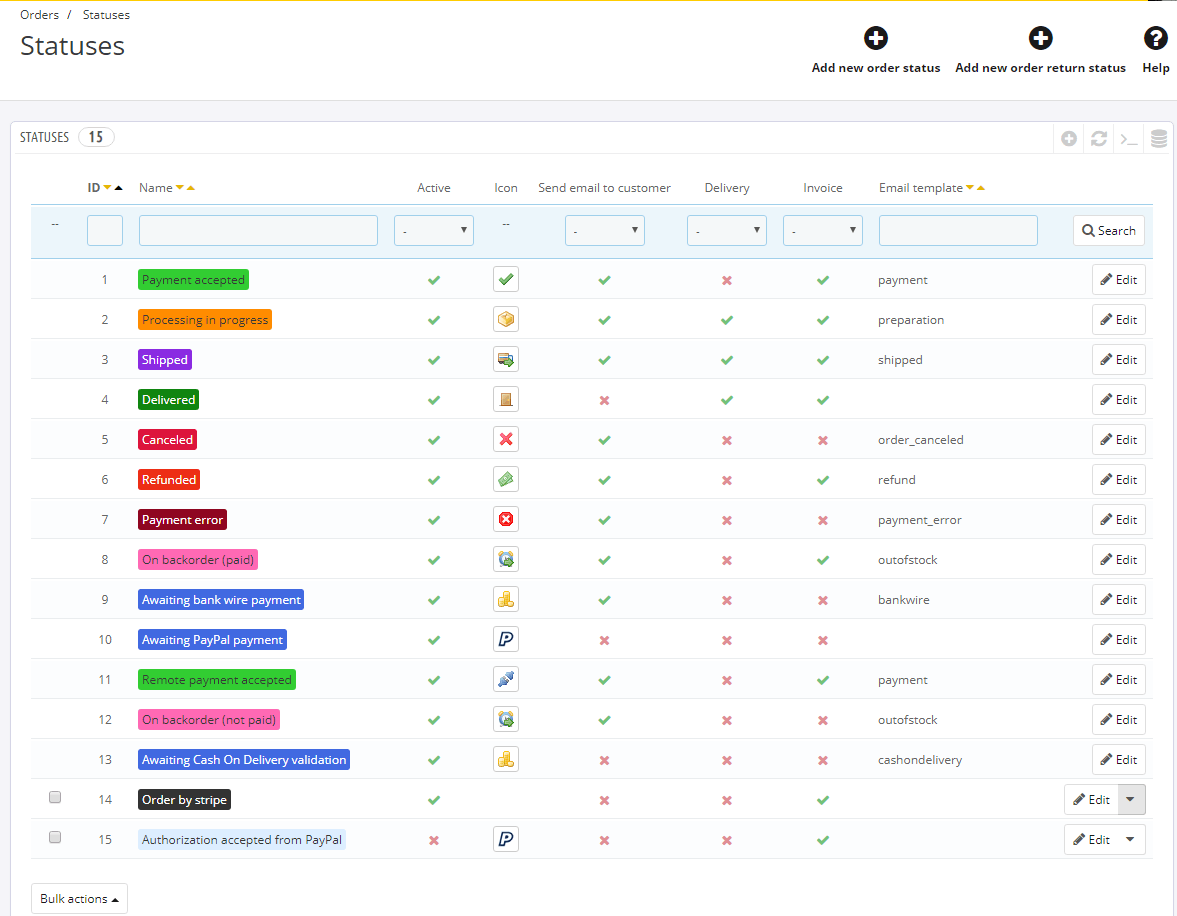
This is a complete list of the statuses available in the shop. In a standard installation there are thirteen default statuses.
Payment accepted: usually set by payment modules that process standard payments (like credit cards).
Processing in Progress: set by the merchant once the order is evaluated.
Shipped: set by the merchant once the order has been shipped.
Delivered: seldom used without automation.
Canceled: set by the merchant upon cancellation, restores product stock.
Refunded: usually set by the merchant after cancelling an order. It’s also set by modules that include an automated refund button.
Payment Error: automatically triggered when a payment processor encounters trouble and the payment is refused.
On Backorder (paid): set in place of Payment Accepted when the products ordered are out of stock.
Awaiting Bankwire Payment: specific to the Bankwire module, it’s the default status for an order placed using that payment method.
Awaiting Paypal Payment: specific to the default Paypal module, it’s the default status for an order placed using that payment method, and it’s set while the payment is being processed if any delay occurs. Seldom used.
Remote Payment Accepted: seldom used, very similar to payment accepted, can be used to differentiate from it if necessary.
On Backorder (not paid): set when an out of stock product is ordered, but the order has not been paid for yet (like for bankwire)
Awaiting Cash On Delivery Validation: specific to the COD module, it’s the default status for an order placed using that payment method.
Any status following these has been created either manually or by a module. While default Order Statuses cannot be erased, as they are integral part of the system, custom ones can be. It’s strongly recommended not to do it in any case, unless the module they refer to has been completely removed.
Order Status Options
Each status has several configurable options, that can be changed at any time and for each one of them, including default statuses.
Let’s click on Payment Accepted.
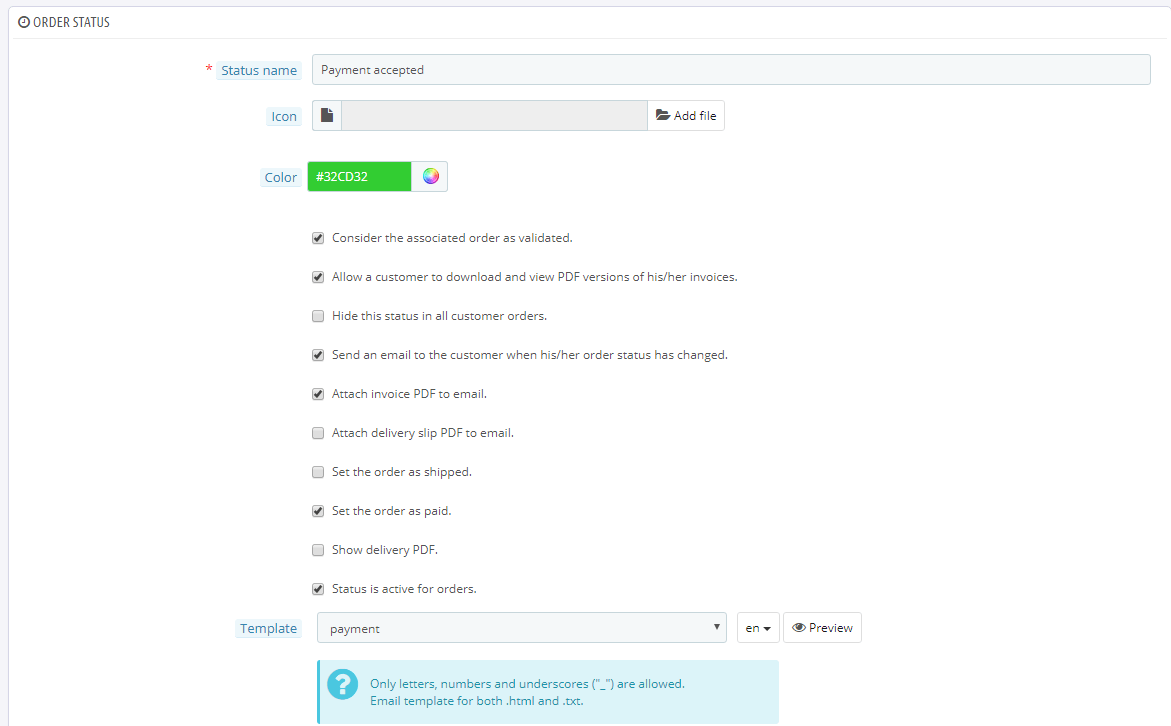
From this panel we can customize every aspect of a status. While Name, Icon and Color are pretty obvious settings, let’s go through some of the other important ones.
Consider the associated order as validated: this tells the system that an order set to this status is considered valid and paid. The products’ stock will be taken from your inventory.
Set the order as shipped: if this is ticked, after setting an order to this status, it won’t be possible to make changes to its content anymore.
Set the order as paid: adds the order value to the revenue statistics in the dashboard, and generates an invoice for it.
Show delivery PDF: creates a delivery slip. It’s usually enabled for the Shipped status.
Status is active for orders: sets whether or not this order status can be chosen for an order.
Lastly, we have a box to select an email template. This is the template that will be used in case the “Send an email to the customer when his/her order status has changed” option is ticked.
There are a variety of default templates, that can be edited through the Translations panel, but should you need a specific one, it’s always possible to copy an existing template, rename the .txt and .html files in the mails/*language iso code* folder, and use it as a new entry.
Manually processing Orders in thirty bees
Let’s now see how the whole system works, and how we can improve the workflow.
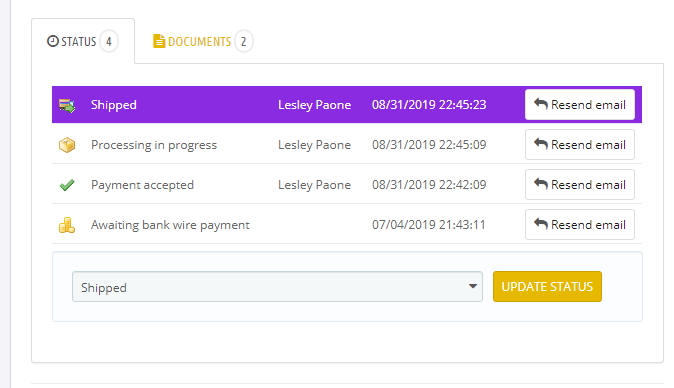
An order just came in, it was paid by Bankwire, so we have to wait for our bank to notify us about a new payment. This is what we will see in the Order View page.
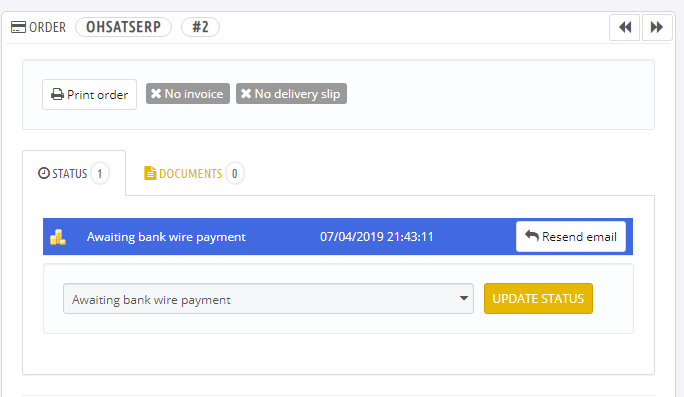
The next day, after the payment is confirmed, we can set the payment to accepted. To do so, let’s click on the dropdown now reading “Awaiting bank wire payment”, select Payment Accepted from the list, and click Update Status.
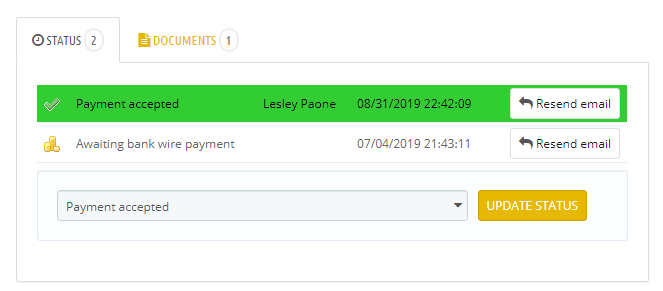
Easy! Now since we have a fast turnaround, and want the customer to know we are taking care of his order, we can immediately set the status to Processing in progress.
It’s very important to be transparent with your customers, and let them know about any change in their order status.
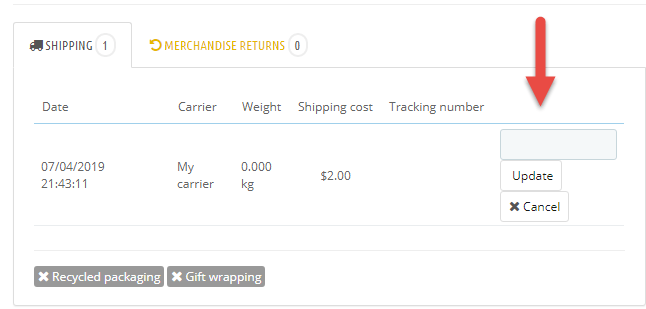
Once we are done, and the package is on its way, we can set the order to Shipped. Before doing this, remember you can set a tracking number, for the customer to be able to follow their order on the carrier’s website, right below the order status panel:
Wrapping it up
And that’s all about order Statuses! As mentioned, all of this manual process can be automated, so that the system itself, together with payment processors and carriers APIs, can take care of setting the order statuses. Stay tuned for the next article, where we will see how the official Stripe Module can be set up to handle different order statuses.